In this era of advanced technology, there lie several chances of unauthorized access from attackers that are hard to recognize by developers. There is however a stellar mechanism to automatically restrict the vulnerabilities and secure the app. Thissystem is popularly known as the Spring Security framework.
Spring Security provides built-in authorization, authentication and offers many other crucial features for securing your apps and services.
It has an easy interface that helps to understand and extend its framework utility to maximize the advantages.
There is a brand-new Java framework known as the Spring Boot framework developed by the team at Pivotal which contains a module called Spring Security. With minimal coding, it secures the resources of the web application from unauthorized access.
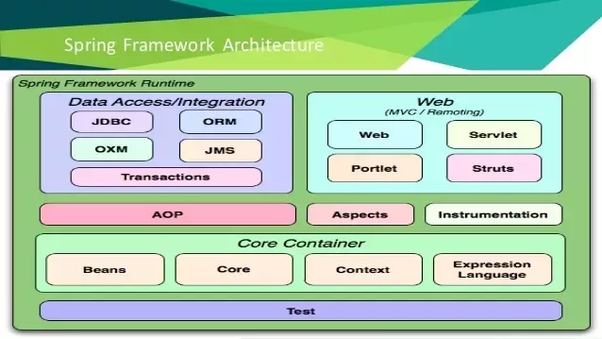
Spring Boot is an open-source platform designed to simplify the development of new Spring applications and bootstrapping. It is very easy to integrate Spring Boot applications with its Spring ecosystem, those being Spring JDBC, Spring ORM, Spring Data, Spring Security etc.
Why use Spring Security?
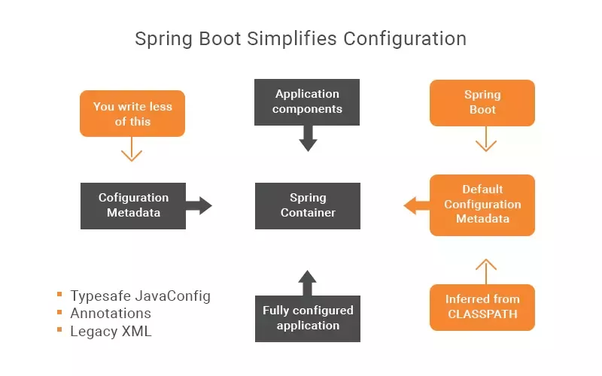
- Configuration: Spring Boot is an approach to develop a spring-based application with very minimal configuration. It has a set of build files such as Starter Poms and Gradle through which one can easily add required dependencies and also facilitate auto-configuration. There is no need to define the boilerplate configuration.
- Coding: There are default codes available to quick start new spring projects within no time. The developer can code in their own authenticated mechanism. It follows the approach of “Opinionated Defaults Configuration” and can reuse the code.
- Classes: It automatically configures essential classes depending on the libraries of its Classpath. Suppose your application needs to interact with the database. In this scenario, data libraries of Spring on Classpath automatically set up a connection to the database along with the class of data source.
- Application development: By introducing the POJO model, it is easy to develop an application in Spring Framework. It is very simple to develop spring-based applications with Java or Groovy. Not only that, it also increases productivity and helps in reducingplenty of app development time.
- Integration: There are no such particular security standards followed by systems whena developer applies Spring Security for the first time. That is why Spring Security is flexible to work in integration with Lightweight Directory Access Protocol (LDAP) as well. Furthermore, it is very easy to integrate Spring ecosystem like Spring JDBC, Spring ORM, Spring Data, Spring Security etcetera with Spring Boot Application.
- Testing: To test and develop web applications, it provides embedded HTTP servers like Jetty, Tomcat etc. The CLI (Command Line Interface) tool is used to develop and test the Spring Boot (Java or Groovy) applications from the command prompt faster and smoother.
What’s more, it also provides numerous plugins to develop and test Spring Boot applications using build tools like Maven and Gradle. It also avails lots of plugins to work with embedded and in-memory databases quite easily.
One can safely say that Spring boot has effectively improved simplicity, testability and productivity by minimizing the development time.
How Spring Boot works
Spring boot provides security to apps and its starter projects help to create a different type of Spring application.
Let’s first get started with the Spring boot “hello world” example.
Step 1 – Spring boot @EnableAutoConfiguration
EnableAutoConfiguration executes Spring Boot more conveniently for developers. By using this annotation automatic configurations begin taking place which is based on the dependency you have added to the projects.
The first thing it asks Spring Boot is to “guess” how you want to configure Spring, based on the dependencies that you have added.
The auto-configuration will always assume that you are developing a web application and setup Spring accordingly since spring-boot-starter-web addedSpring MVC and Tomcat.
Step 2- Spring boot starter parent and Spring boot starter web
Adding spring boot parent and starter web dependency in maven pom.xml.
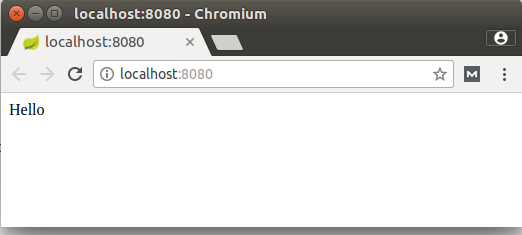
For execution, Spring boot will deploy the code in tomcat with default 8080 port.
Now open the browser and type localhost:8080
Output:
How does Spring Security secure a web application?
Essentials:
- JDK 1.8 or later
- IDE
- Spring MVC application with a login form that already has a list of authorized users.
- A build system of either Maven 3.2 or later orGradle 4 or later.
Step 1:Update the build.gradle or POM.xml with following code snippets
If you are using the Gradle build system, you have to add a dependency for the Spring Security to work. The code you have to add in below “dependencies”:
- dependencies {
- compile(“org.springframework.boot:spring-boot-starter-security”)
- }
If your project is using the Maven build system, then add the following line of code in <dependencies> section in POM.xml
- <dependencies>
- <dependency>
- <groupId>org.springframework.boot</groupId>
- <artifactId>spring-boot-starter-security</artifactId>
- </dependency>
- </dependencies>
Step 2: Setting the security configuration in the application
In this step, first, you will need to create a class for configuration. It will be extended by WebSecurityConfigurerAdapter and you will override its configure() and userDetailsService() methods.
configure()- This method contains two types of code for application paths, one for the requirement of security and others for no requirement of security.
userDetailsService()- This method is used to store the information of the in-memory user. An authorization of a user is created by using credentials code.
- import org.springframework.context.annotation.Bean;
- import org.springframework.context.annotation.Configuration;
- import org.springframework.security.config.annotation.web.builders.HttpSecurity;
- import org.springframework.security.config.annotation.web.configuration.EnableWebSecurity;
- import org.springframework.security.config.annotation.web.configuration.WebSecurityConfigurerAdapter;
- import org.springframework.security.core.userdetails.User;
- import org.springframework.security.core.userdetails.UserDetails;
- import org.springframework.security.core.userdetails.UserDetailsService;
- import org.springframework.security.provisioning.InMemoryUserDetailsManager;
- @Configuration
- @EnableWebSecurity
- public class WebSecurityConfig extends WebSecurityConfigurerAdapter {
- @Override
- protected void configure(HttpSecurity http) throws Exception {
- http
- .authorizeRequests()
- .antMatchers(“/”, “/main”).permitAll()
- .anyRequest().authenticated()
- .and()
- .formLogin()
- .loginPage(“/userLogin”)
- .permitAll()
- .and()
- .logout()
- .permitAll();
- }
- @Bean
- @Override
- public UserDetailsServiceuserDetailsService() {
- UserDetails user =
- User.withDefaultPasswordEncoder()
- .username(“user”)
- .password(“password”)
- .roles(“USER”)
- .build();
- return new InMemoryUserDetailsManager(user);
- }
- }
Step 3: Creating a login form to access the web application
Once the security is applied to the path of the application, it’s time to see it in action.
We need to create a login page by following steps-
- Login Page obtains the value of the username and password and transfers the value to the main URL of the entry page of the application.
- If the value of the credentials is correct, it will allow the user to access any URL of the application.
Example of a simple login page builds in the HTML. The file is main.html.
- <!DOCTYPE html>
- <html xmlns=”http://www.w3.org/1999/xhtml” xmlns:th=”http://www.thymeleaf.org”
- xmlns:sec=”http://www.thymeleaf.org/thymeleaf-extras-springsecurity3″>
- <head>
- <title> Main Page </title>
- </head>
- <body>
- <h1>Welcome</h1>
- <form th:action=”@{/main}” method=”post”>
- <div><label> User Name : <input type=”text” name=”username”/></label></div>
- <div><label> Password: <input type=”password” name=”password”/></label></div>
- <div><input type=”submit” value=”Sign In”/></div>
- </form>
- <div th:if=”${param.error}”>
- Username or password is incorrect, you are not authorized to login. Thanks.
- </div>
- </body>
- </html>
The form will submit the value of the username and the password to the main URL.
After submitting, the Spring Security will come into being, whereafter the security framework can take the appropriate actions based on credentials.
To make this HTML view (page) associated with the security feature, we need to attach it with the MVC Controller.
- public void addViewControllers(ViewControllerRegistry registry) {
- registry.addViewController(“/main”).setViewName(“home”);
- }
Step 4: Testing the feature
When the user accesses the main URL, the following page will show.

After logging in successfully, the user will be authorized to access all the URLs or resources of the application.
Conclusion
According to the build system, you will need to add the dependency in the project’s POM or build.gradle file to enable the features of Spring Security in applications of Spring Boot.
After that, you will need to create a configuration file. It will contain URLs requiring authentication. Then all you need is a login page that will submit the value of the credentials to Spring Security to let it perform a check whether the user is allowable to log in with authorization or not. Lastly, you just need to add this login page to the MVC controller of the application.